Small Pond Installations for Irrigation and Wildlife - Part 2 - Liners
Small Pond Installations for Irrigation and Wildlife - Part 2 - Liners - Hallo sahabat How to Plant Vegetable, Pada Artikel yang anda baca kali ini dengan judul Small Pond Installations for Irrigation and Wildlife - Part 2 - Liners , kami telah mempersiapkan artikel ini dengan baik untuk anda baca dan ambil informasi didalamnya. mudah-mudahan isi postingan
Artikel HDPE liners,
Artikel irrigation,
Artikel LDPE liners,
Artikel permaculture ponds,
Artikel pond,
Artikel pond digging,
Artikel pond installation,
Artikel pond liners,
Artikel pond making,
Artikel wildlife gardening,
Artikel wildlife ponds, yang kami tulis ini dapat anda pahami. baiklah, selamat membaca.
Judul : Small Pond Installations for Irrigation and Wildlife - Part 2 - Liners
link : Small Pond Installations for Irrigation and Wildlife - Part 2 - Liners
During this post we'll look at liner options and the steps you need to take to install a liner for your pond.
The majority of ponds will need some kind of liner to stop water seeping into the surrounding soil. For ponds in lowland with a high water table on clay soils, or ponds with a perennial source of water that can flow into and out of the pond, a liner is not necessary, but for rain fed (either direct or via roof/land catchments) ponds, or for ponds with an ephemeral source of water in climates with long dry seasons, a liner will be needed.
We commonly use tri-laminate LDPE liners for our ponds as they are relatively light, easy to install and good value.
However, there are a variety of pond liners available to suit your site conditions and budget and before looking at how we install our liners we'll go briefly over the options starting with the natural liners.
Tri Laminate LDPE - These are the liners that we use for our ponds. They have two basic benefits – they are very economical, and they are tear proof and flexible so can be used to line ponds with various depths, shelves and peninsulas i.e wildlife ponds. The liners are made of low density polypropylene and they are made to last for years.
Tri Laminate HDPE - HDPE geomembranes are tough and non-flexible. In cold weather conditions the handling of HDPE geomembranes is a big handicap and not being very flexible they only work on basic shaped ponds.
Rubber Liners - like LDPE these liners can be easily shaped to fit the unique contours of any pond, thus allowing more design flexibility. There are two main types of rubber liners EPDM and Butyl. They are both synthetic rubber membranes and both liner types have similar properties despite having different chemical compositions. EPDM is a less expensive product to manufacture and as a result its popularity has surpassed that of Butyl. EPDM pond liners are guaranteed fish-friendly and they don't contain any additives or release chemicals that affect fauna or flora. These liners are slightly more puncture resistant than the LDPE and HDPE and PVC liners.
PVC pond liners – PVC pond liners are usually around 0,5 mm thick. The liner is stretchy and flexible , however it's not tear proof, so if the material is punctured, it may get worse over time. They are more expensive than LDPE and HDPE but just as vulnerable and more so to UV exposure, so I don't see much upside to this liner.
Preformed fiber glass pond liners – As the name suggests, these liners are preformed. You dig the hole to fit the shape. They are relatively expensive and are probably one of the easy ponds to install.
Length + Depth + Depth + 2m = Length of Liner
Width + Depth + Depth + 2m = Width of Liner
Following the excavation it's a good idea to allow and deposited soil around the edges of the pond to settle. 2 weeks is adequate time for the soil to settle. The next step is to level the bank of the pond .
Create the outlet of your pond (where the pond will overflow). It's very important you have considered where the pond will overflow and have managed the overflow properly to avoid the water causing damage on or beyond your property. In our case we made a 2m x 1m marshy bed that drains into a 10m long by 1m contour swale that can disperse and overflow into the fields below planted with perennial crops.
If you have stony ground like we had on this pond, you can spend days removing the stones only to unearth more below. In such cases I recommend adding a layer of vegetation or straw, old clothes or carpets before adding the underlay. The idea is that this layer will decompose and form an anaerobic bio film that will prevent seepage if the stones happen to puncture the liner.
Now is time for the underlay that generally comes in rolls. We placed the underlay along the longest side and overlapped each section by at least 20 cm and then taped the sections together. Working on a calm day without wind is a good idea when placing the underlay. Soaking the rolls in water also helps as the material is heavier and falls into place easier.
Unfold the liner and pull it into place ensuring you have adequate overlap on the sides. Push the liner into place to hug the contours and ease out any small wrinkles and neatly pleat any larger folds.
Do not start work on finishing the pond edges until the pond is full. This is because as the pond fills with water the liner will be compressed to fit the pond floor and sides, and some slack on the edges allows the liner to move without stretching. When the pond is full you will also be able to see whether your levels are correct and make any final alterations before adding the pond border detail and fixing the liner to the border.
We filled the pond by diverting a stream from a nearby river. We channeled the stream to the pond and buried the liner under the channel to direct the water into the pond. The pond can hold approx. 150 m3 and took over 40 hrs to fill.
If you would like the pond for wildlife then adding a bucket of water from a nearby wild pond will provide a range of microorganisms, aquatic plant seed and aquatic animals. Aquatic life is very fast to establish and in no time the pond will be full of aquatic insects.
It's best to keep the water level right to the top but this is not always possible. This will require regular topping up in summer as evaporation can reduce the levels. A pond liner that is exposed to the elements will have a shorter life and be more prone to mechanical damage.
Once the pond is full you can check you have the bank levels correct and make any adjustments that may be needed before adding the pond edging.
Anda sekarang membaca artikel Small Pond Installations for Irrigation and Wildlife - Part 2 - Liners dengan alamat link https://howtoplanvegetable.blogspot.com/2017/06/small-pond-installations-for-irrigation.html
Judul : Small Pond Installations for Irrigation and Wildlife - Part 2 - Liners
link : Small Pond Installations for Irrigation and Wildlife - Part 2 - Liners
Small Pond Installations for Irrigation and Wildlife - Part 2 - Liners
Welcome to part 2 in a series of posts covering the installation of small irrigation and wildlife ponds. Part one can be found here and covers planning and digging a pond.During this post we'll look at liner options and the steps you need to take to install a liner for your pond.
 |
| Lining the pond in Ataraxia |
Pond Liner Options
We commonly use tri-laminate LDPE liners for our ponds as they are relatively light, easy to install and good value.
 |
| Tri-laminate LDPE liner |
However, there are a variety of pond liners available to suit your site conditions and budget and before looking at how we install our liners we'll go briefly over the options starting with the natural liners.
Natural Liners
Puddled Clay - Using clay to line a pond is a great idea if you have the right kind of clay soils on the location of the pond or very near by. Otherwise given the large quantity of clay required the excavation and transport costs probably make it not worth considering. You also need to be sure you have a constant water level if using certain clay that will shrink and swell. This is because when the water level drops cracks will appear and water will drain into the cracks when it refills.
Another thing to consider if you are adding a clay layer on top of permeable soils such as sandy and stony soils is that aquatic plants with expansive rhizomatous roots such as reeds, sedges, watermint and yellow flag can easily damage the clay layer creating holes that will lose water.
 |
| Clay cracking when water levels drop |
Another thing to consider if you are adding a clay layer on top of permeable soils such as sandy and stony soils is that aquatic plants with expansive rhizomatous roots such as reeds, sedges, watermint and yellow flag can easily damage the clay layer creating holes that will lose water.
Some soils are unsuitable for clay . Gravelly, silty and peaty soils are affected by ground water and move. The puddle clay will also move, resulting in cracks and leaks.
Bentonite Clay Liners are a composite product manufactured using the naturally occurring Bentonite clay resource. The powdered Bentonite clay is sandwiched between a woven and non woven geotextile, resulting in a very strong robust product. The biggest advantage of bentonite is that it can self-heal and expand around punctures if it’s installed correctly. The biggest disadvantage is that it's relatively expensive, extremely heavy (making delivery costs high) and often heavy machinery is required to place the liner.
Gley - The idea behind a gley liner is to produce an anaerobic layer in the soil underneath the pond that forms a bio film that should prevent water from soaking into the soil. It's something I came across in the Permaculture Design Manual and having tried it on three occasions I can safely say it does not work.
 |
| Following instructions for the gley method we applied approx 2 tonnes of manure to our pond in the Paulownia garden, covered this with a layer of vegetation and added a further cover of tarps and carpets. It did not hold water and we eventually added a tri laminate LDPE liner. |
Synthetic liners
Tri Laminate HDPE - HDPE geomembranes are tough and non-flexible. In cold weather conditions the handling of HDPE geomembranes is a big handicap and not being very flexible they only work on basic shaped ponds.
Rubber Liners - like LDPE these liners can be easily shaped to fit the unique contours of any pond, thus allowing more design flexibility. There are two main types of rubber liners EPDM and Butyl. They are both synthetic rubber membranes and both liner types have similar properties despite having different chemical compositions. EPDM is a less expensive product to manufacture and as a result its popularity has surpassed that of Butyl. EPDM pond liners are guaranteed fish-friendly and they don't contain any additives or release chemicals that affect fauna or flora. These liners are slightly more puncture resistant than the LDPE and HDPE and PVC liners.
PVC pond liners – PVC pond liners are usually around 0,5 mm thick. The liner is stretchy and flexible , however it's not tear proof, so if the material is punctured, it may get worse over time. They are more expensive than LDPE and HDPE but just as vulnerable and more so to UV exposure, so I don't see much upside to this liner.
Preformed fiber glass pond liners – As the name suggests, these liners are preformed. You dig the hole to fit the shape. They are relatively expensive and are probably one of the easy ponds to install.
Cost comparison for Liners
I made a quick cost comparison for a 18 m x 18 m liners. It's by no means exhaustively researched but it does provide a fair representation of the varying costs of liners.
| Liner | Price based on a 18m x 18m liner 324m2 | Price per m2 | Source | Notes |
| Rubber Liner - Butyl | £1,940.76 | £5.99 | http://watergardeningdirect.com | not including delivery no underlay |
| Rubber Liner - EPDM | £1,710.72 | £5.28 | www.aqualinersdirect.co.uk | not including delivery no underlay |
| Bentonite Clay Liners | £1,101.60 | £3.40 | www.bentomat.co.uk | not including delivery no need for underlay |
| PVC | £842.40 | £2.60 | www.aqualinersdirect.co.uk | not including delivery no underlay |
| Tri Laminate LDPE | £533.60 | £1.65 | ebay.co.uk | including delivery and underlay |
| Tri Laminate HDPE | £223.56 | £0.69 | China - Alibaba (could not find a European source) | not including delivery and customs tax |
We've been using tri laminate LDPE liners in our ponds for the last 6 years and have lined 4 ponds with it. The first pond we made still holds water well although I expect that the ground under the liner will have formed a natural impermeability by now due to anaerobic microorganisms creating a bio film.
 |
| Our first pond |
I've noticed that the material does weather when exposed to sunlight so we keep the liner covered with a layer of sand/soil and this also provides good rooting medium for aquatic plants. Wildlife appears to flourish in the ponds and I have no reason to believe the material is toxic in any way.
 |
| Wildlife from our ponds |
Sizing the liner
To calculate how big your liner needs to be you can use the following equation.
Length + Depth + Depth + 2m = Length of Liner
Width + Depth + Depth + 2m = Width of Liner
You can find an online pond liner size calculator here in imperial and metric units :)
Often the ponds we create have varying depths and beaches as we are designing habitat into the ponds. In this case you can take the longest length, depth and width to be sure you have enough liner. The off cuts are useful for doubling up areas of the pond that may receive foot traffic or for creating very small tyre ponds.
 |
| Tractor Tyre pond lined with an off cut from the main pond liner |
Applying the liner
Here are the steps we took to line the pond. For how we dug the pond and planning the location of the pond see our previous post here.
1. Remove sharp stones and other debris
2. Level the banks of the pond
3. Establish the outlet and overflow management
4. Add Protective Underlay
5. Place the liner
6. Fill the pond
Remove all stones and sharp objects from the area where the liner will be placed
1. Remove sharp stones and other debris
2. Level the banks of the pond
3. Establish the outlet and overflow management
4. Add Protective Underlay
5. Place the liner
6. Fill the pond
1. Remove sharp stones and other debris
Remove all stones and sharp objects from the area where the liner will be placed
 |
| Just one of the piles of stones we removed from the pond. |
2. Level the banks of the pond
Following the excavation it's a good idea to allow and deposited soil around the edges of the pond to settle. 2 weeks is adequate time for the soil to settle. The next step is to level the bank of the pond .
 |
| Using a transit level we go around the pond perimeter adding or removing soil until we have the same level all round. |
3. Establish the outlet and overflow management
 |
| The outlet - We then lowered the area of the wall that will serve as the outlet. In this case we made the outlet a 30cm wide channel that is approximately 10 cm lower than the rest of the wall. |
4. Add Protective Underlay
If you have stony ground like we had on this pond, you can spend days removing the stones only to unearth more below. In such cases I recommend adding a layer of vegetation or straw, old clothes or carpets before adding the underlay. The idea is that this layer will decompose and form an anaerobic bio film that will prevent seepage if the stones happen to puncture the liner.
 |
| 15 cm layer of straw applied to the surface |
Now is time for the underlay that generally comes in rolls. We placed the underlay along the longest side and overlapped each section by at least 20 cm and then taped the sections together. Working on a calm day without wind is a good idea when placing the underlay. Soaking the rolls in water also helps as the material is heavier and falls into place easier.
 |
| Rolling out the black carpet. |
5. Place the liner
Unfold the liner and pull it into place ensuring you have adequate overlap on the sides. Push the liner into place to hug the contours and ease out any small wrinkles and neatly pleat any larger folds.
 |
| Liner in place with adequate overlap and folds where they should be. |
Do not start work on finishing the pond edges until the pond is full. This is because as the pond fills with water the liner will be compressed to fit the pond floor and sides, and some slack on the edges allows the liner to move without stretching. When the pond is full you will also be able to see whether your levels are correct and make any final alterations before adding the pond border detail and fixing the liner to the border.
6. Filling the pond
We filled the pond by diverting a stream from a nearby river. We channeled the stream to the pond and buried the liner under the channel to direct the water into the pond. The pond can hold approx. 150 m3 and took over 40 hrs to fill.
 |
| Here you can see the water just about to enter the liner that is buried under the channel |
 |
| The stream is diverted onto the liner and the water flows into the pond. This pond took over 40 hrs to fill |
 |
| Almost full |
If you would like the pond for wildlife then adding a bucket of water from a nearby wild pond will provide a range of microorganisms, aquatic plant seed and aquatic animals. Aquatic life is very fast to establish and in no time the pond will be full of aquatic insects.
It's best to keep the water level right to the top but this is not always possible. This will require regular topping up in summer as evaporation can reduce the levels. A pond liner that is exposed to the elements will have a shorter life and be more prone to mechanical damage.
Once the pond is full you can check you have the bank levels correct and make any adjustments that may be needed before adding the pond edging.
7. Edging The Pond Banks
The excess liner can be trimmed off allowing at least 50 cm of overlap that can be tucked under to provide a double layer around the edge of the banks. We have lots of stones and boulders around our site and place these on top of the liner and fill the gaps with sand and smaller stones. This makes the pond look natural and protects the liner from harmful UV from the sun.
 |
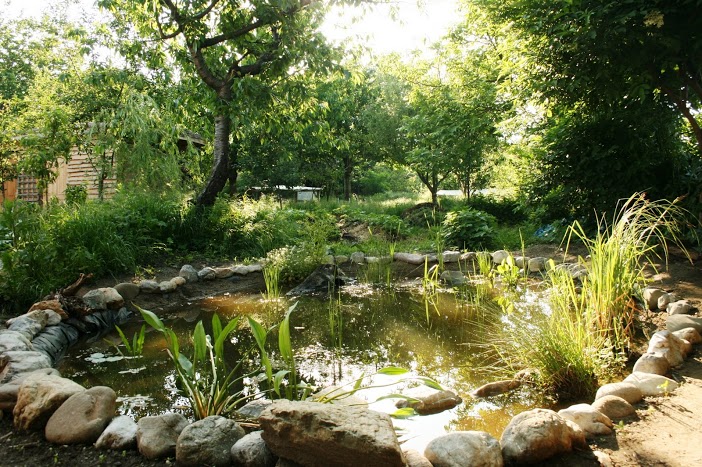
| Rock borders with plants well established in our wildlife pond |
For this pond we'll be experimenting with cascading plants such as Vinca spp. and Hedera spp. placing them around the edge of the pond to cover the exposed liner. More on that in part 3 where we'll be looking at wildlife habitat and planting out the pond.
If you would like to be updated on our new articles and receive our quarterly newsletter you can subscribe below.
If you would like to create a forest garden and gain some practical hands on experience join us this Spring. We'll be covering site surveying, landscape design software, installing access, beds, irrigation channels, planting tree, shrub, herb and ground layers and making a small wildlife pond. All in 3 days! And plenty of follow up material to take away with you to digest slowly.


We offer a diversity of plants and seeds for permaculture and forest gardens including a range of fruit and nut cultivars. We Deliver all over Europe from Nov - March. Give a happy plant a happy home :)
 |
| The Bionursery |
 |
If you appreciate the work we are doing you can show your support in several ways.
|
References
- Geosynthetic Clay Liners Bentonite - http://www.bentomat.co.uk/
- Clay Liner - http://www.gardeningmasterclass.co.uk/how-to-garden-ponds/puddled-clay-ponds/
- PVC vs HDPE http://www.geomembrane.in/comparison.html
- Pond liner calculator - http://www.pondlinersonline.co.uk/pond-calculator/
Demikianlah Artikel Small Pond Installations for Irrigation and Wildlife - Part 2 - Liners
Sekianlah artikel Small Pond Installations for Irrigation and Wildlife - Part 2 - Liners kali ini, mudah-mudahan bisa memberi manfaat untuk anda semua. baiklah, sampai jumpa di postingan artikel lainnya.
Anda sekarang membaca artikel Small Pond Installations for Irrigation and Wildlife - Part 2 - Liners dengan alamat link https://howtoplanvegetable.blogspot.com/2017/06/small-pond-installations-for-irrigation.html
Belum ada Komentar untuk "Small Pond Installations for Irrigation and Wildlife - Part 2 - Liners "
Posting Komentar